Uyarı: Bu blogda paylaşılan içerikler yalnızca bilgilendirme amaçlıdır. Herhangi bir hata, eksiklik veya kullanım sonucu doğabilecek sorunlardan sorumluluk kabul edilmez. Anlatılanları uygulamak tamamen okuyucunun kendi sorumluluğundadır.
Ön bilgilendirme
Bu yazı boyunca Linux Fedora 43 rawhide işletim sistemine nasıl Nvidia driver’ları kurulacağını anlatacağım.
Özellikle Linux dünyasına yeni geçen arkadaşlara sık sık önerilen bir işletim sistemi olan Fedora, açık kaynak politikasından dolayı kapalı kaynak (proprietary) driverları kendi paketlerinde bulundurmuyor. Bu sebeple eğer içinde Nvidia GPU’su bulunan bir bilgisayarınıza nvidia driver’i kurmak istiyorsanız, RPM fusion deposunu sisteme ekleyip manuel olarak kurmak zorundasınız.
RPM fusion’a https://rpmfusion.org/ linkinden ulaşabilirsiniz. Kaynağım çoğunlukla burası olacaktır.
Aslında pek zor bir işlem olmasa da linux’a yeni başlayanlar için biraz kafa karıştırıcı olması muhtemel. Aşağıda anlatacağım yöntemleri tek tek uygulayarak, kolaylıkla Nvidia driverlarını kurup, sistem güncellemeleriyle beraber her zaman en güncel sistemde kalabilirsiniz.
1. Hazırlık
Sistemin güncel ve hazır olduğunu doğrulamak için komut çalıştıracağız. Bunu yapmak için öncelikle terminal çalıştırmanız gerekir. Bunun için çoğunlukla kısayol Control + Alt + T olsa da XFCE gibi sistemlerde bu değişebilmekte, bu sebeple kısayolla açamamınız durumunda arama kısmına Terminal yazmanız yeterli olacaktır. Rehber boyunca terminal açın dediğimde bundan bahsetmiş olacağım. Terminal gözünüze karmaşık veya korkutucu gelmesin. İnanın yapacağınız en zor şey kopyala yapıştır olacak.
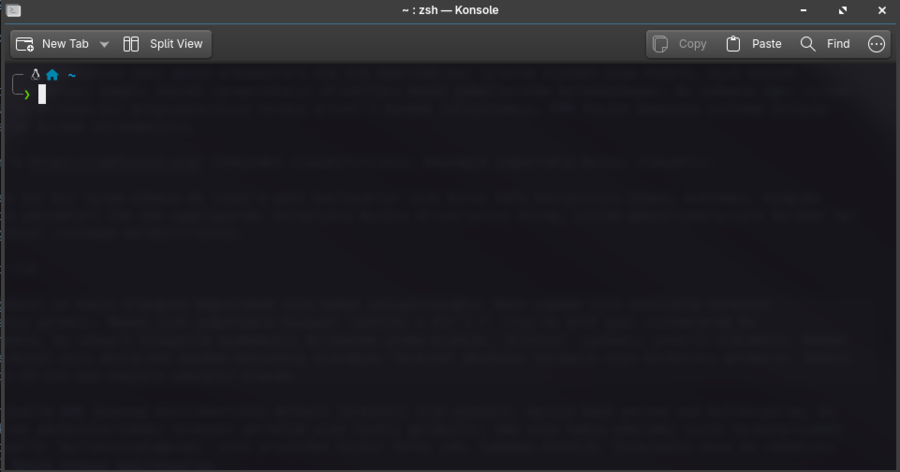
Benim terminalim KDE desktop enviromentinin default terminali olan Konsole. Ayrıca bash yerine zsh kullanıyorum, bu sebeple ekran görüntülerindeki terminal görselim size farklı gelebilir. Ama size temin ederimki sizin terminalizdeki büyük ihtimalle kullaniciadi@PCadi olan arayüzden hiçbir farkı yok, tamamen estetik. İsterseniz onun da rehberini yazarım :) Neyse konuyu dağıtmayalım.
Terminale şu komutu yazın
sudo dnf update
Bunu yazdığınız gibi sizden şifrenizi isteyecektir. Şifrenizi girin. Şifreyi yazdığınızı * ile vs göremeyeceksiniz. Merak etmeyin şifreyi giriyorsunuz. Tamamını girdikten sonra Enter tuşuna basın. Bastığınız gibi güncellemeler başlayacaktır. Sizden güncelleme ve paket onayı istiyorsa y yazıp geçmeniz yeterli. Her şey bittiğinde x packages updated tarzı birşeyler yazacak, kullaniciadi@PCadi gözükecek ve terminale birşeyler yazmanıza izin verecektir.
Buraya kadar bahsedilen kısım yazının kalan kısmında tekrar detaylandırılmayacak ve yine aynı şeyler aynı yöntemlerle yapılacaktır.
Uyarı: Sistemi yeni kurduysanız ve ilk kez güncelleme yapıyorsanız, sistemi yeniden başlatmanızı öneririm. Aksi takdirde problem yaşayabilirsiniz.
Sonrasında RPM Fusion paketlerini sistemimizde aktif edeceğiz. Bunun için terminalinizde şimdi bu kodu çalıştırmanız gerekecek. Kod çok kısa sürecektir.
sudo dnf install https://mirrors.rpmfusion.org/free/fedora/rpmfusion-free-release-$(rpm -E %fedora).noarch.rpm https://mirrors.rpmfusion.org/nonfree/fedora/rpmfusion-nonfree-release-$(rpm -E %fedora).noarch.rpm
Bu da bittiğinde ikinci adıma geçebilirsiniz.
2. Secure Boot anahtar kayıdı
Şimdi ikinci aşamaya geçtik. Bu aşama biraz karmaşık gözükse de aslında oldukça kolay. Öncelikle bir sebepten dolayı sisteminizde secure boot açık olabilir, bunu kontrol etmemiz gerekiyor. Bunun için aşağıdaki komutu terminalinizde çalıştırın.
mokutil --sb-state
Eğer enabled geri dönüşü alıyorsanız bu adımı atlayıp 3. adıma geçebilirsiniz. Secureboot konusunda ek bir adım yapmayın!
Eğer disabled geri dönüşü alıyorsanız bilgisayarınızda secureboot’u açmanız gerekecek.
2.1. Secureboot kurulumu
Öncelikle anahtar oluşturmak için aşağıdaki gerekli kütüphaneleri kurmanız gerekecek.
sudo dnf install kmodtool akmods mokutil openssl
Sonrasında ise bir varsayılan bir anahtar oluşturun.
sudo kmodgenca -a
Eğer bunu yaparken WARNING: EXISTING KEY PAIR` tarzı bir hata alırsanız komutu bu şekilde force ile yazın.
sudo kmodgenca -a --force
Problem olmadıysa force’lu komutu yazmayın!
Bu kısmı da hallettiğinizde aşağıdaki komutu girerek bir anahtar oluşturmanız gerek. Anahtarın şifresini 0000 tarzı çok basit bir şey girin.
Uyarı: Numara girerken numpad kullanmayın, problem yaşayabilirsiniiz. Onun yerine sıra halindeki, harflerin üzerindeki sayı tuşlarını kullanın. Boot menüsü bazen numpadi algılayamayabilir.
sudo mokutil --import /etc/pki/akmods/certs/public_key.der
Bunu da yaptıktan sonra sistemi yeniden başlatmanız gerekecek. Yeniden başlattığınzda mavi bir ekranla karşılaşacaksınız.
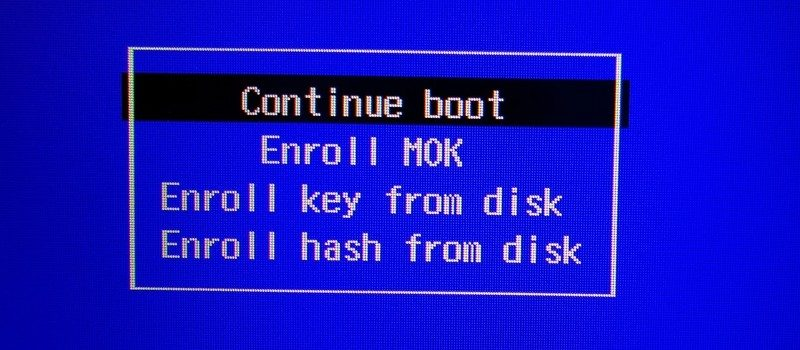
Eğer bu ekran değil de MOK managment tarzı bir şey çıktıysa bir kereliğine Enter tuşuna basmanız yeterli. Bu ekrana ulaşacaksınızdır.
Yapacağınız tek şey, burada ok tuşlarıyla aşağı inip Enroll MOK demek olacaktır. Sonrasında Continue diyecek, Yes‘i seçerek şifre girme menüsüne geleceksiniz. Burada kendi şifrenizi değil, yukarıda bahsettiğim 0000 tarzı anahtarı kullanmanız gerekecek. Sonrasında Reboot‘u seçerek bilgisayarınızı yeniden başlatın.
Bilgisayarınızın açılmasını bekleyin ve bu kadar. İşin zor kısmını bitirdiniz bile.
3. Driver’ları kurmak
Sisteminizde secure boot’u açtığınıza göre artık driver kurmaya tamamen hazırsınız. Bu adımda öncelikle Nvidia gpu’nuzu biliyor olmanız gerekiyor. Hangi GPU’yu kullandığınızı biliyorsanız sorun yok. Eğer bilmiyorsanız aşağıdaki komutu terminalde çalıştırararak öğrenebilirsiniz.
lspci | grep -iE 'VGA|3D|nvidia
Kurulum işine başlamadan önce loglama yapabilirsiniz, böylece kurulumun daha net izleyebilirsiniz. Yeni bir terminal açıp içine şu komutu yapıştırın.
sudo journalctl -f -u akmods
Bu komut çalıştığı sürece Nvidia değişikliklerini izleyecek, değişim olduğunda terminale log düşecektir. Bu terminali kapatmayın. Kurulum için yeni terminal açın.
Ekran kartınız şu dört gruptan birinde olmalı. Doğru grubunuzu internetten GPU modelinizi aratarak bulabilirsiniz. Ya da direkt olarak modelinizin marka isminden bir gruplandırma yapabilirsiniz. Eğer son 15 yıl içerisinde aldığınız bir cihazınız varsa çok büyük ihtimalle 1. veya 2. gruplardan birinde olacaktır, siz yine de kontrol edin.
Sadece size ait olan grup için olan komutu terminalinize yapıştırarak kurulumu başlatın. İndirme boyutları büyük olduğundan kurulum biraz sürebilir.
- NVIDIA’nın yeni GPU’ları (2017 sonrası Geforce 1000 sonrası örn: GTX1080, Quadro, Tesla, RTX modelleri)
sudo dnf install akmod-nvidia sudo dnf install xorg-x11-drv-nvidia-cuda - NVIDIA’nın görece yeni GPU’ları (2014-2017 arası GTX 800/900/10 modelleri)
sudo dnf install xorg-x11-drv-nvidia-580xx akmod-nvidia-580xx sudo dnf install xorg-x11-drv-nvidia-580xx-cuda - NVIDIA’nın görece eski GPU’ları (Geforce 600/700 Kepler,Quadro modelleri)
sudo dnf install xorg-x11-drv-nvidia-470xx akmod-nvidia-470xx sudo dnf install xorg-x11-drv-nvidia-470xx-cuda sudo dnf install plasma-workspace-x11 xorg-x11-drivers xorg-x11-xinit - NVIDIA’nın eski GPU’ları (400/500 Fermi)
Bu ekran kartlar artık Nvidia tarafından desteklenmiyor. Bu sebeple Wayland desteği yok, bu sebeple xorg kullandığınızdan emin olun.
sudo dnf install xorg-x11-drv-nvidia-390xx akmod-nvidia-390xx
sudo dnf install xorg-x11-drv-nvidia-390xx-cuda # Required for nvidia-smi and CUDA support
Kurulum başarıyla bittiyse geriye kalan tek şey kurulumun doğru bir şekilde uygulandığını teyit etmek olacaktır. Bunun için 4. adıma geçiyoruz.
Uyarı: Kurulum kapanır kapanmaz bilgisayarın kapatılması sisteminizi bozabilir. 4. adımı tamamlamadan bilgisayarınızı asla ama asla kapatmayın.
4. Sistem kurulumunu teyit etmek
Buraya kadar geldiyseniz sizi tebrik ederim, son aşamaya gelmiş bulunmaktasınız. Kurulum her ne kadar çok hızlı kurulsa da bazı sistemlerde yavaş olabilir. Bu sebeple temkinli olmanızı öneriyorum. Kurulum bitmeden yeniden başlatmak sisteminizi bozabilir. Güvenli bir kurulum yapın. Bunun iki yolu var, ikisini de uygulamanız sizin için daha iyi olur.
İlk yöntem olarak terminalinizde 5-10 dakikada bir şu komutu çalıştırın. Bu komut aktif versiyonunuzu sizlere gösterir ve kurulumun bittiğini anlamanızı sağlar.
modinfo -F version nvidia
Kurulum başarılı olmuşsa terminalde 570.xxx.xxx tarzı versiyon yazısı görürsünüz. Bunu gördüğünüz gibi bilgisayarınızı yeniden başlatabilirsiniz çünkü kurulum bitmiştir.
Eğer modinfo: ERROR: Module nvidia not found hatası görürseniz paniklemeyin, bu muhtemelen kurulumunuzun daha bitmediğini gösterir ve çoğunlukla hata anlamına gelmez. 5 dakika arayla tekrar deneyin, ikinci metoddan faydalanın.
İkinci yöntemimiz ise yazının yukarısında açmanızı ve kapatmamanızı istediğim sudo journalctl -f -u akmods komutlu terminalinizi inceleyin. Terminaldeki çıktılar son 15 dakikadır değişmiyor/akmıyorsa (sisteminiz eskiyse bekleme sürenizi 1 saate kadar çıkarın.)
çok büyük ihtimalle kurulumunuz bitmiştir.
Muhtemelen başınıza gelmeyecek bir olasılık ama benim başıma geldiği için şunu paylaşmak istiyorum. Eğer log terminaliniz akmıyorsa, bir saatten uzun süre geçen ‘modinfo: ERROR: Module nvidia not found’ komutu durmadan hata veriyorsa ve bunu uzun bir süredir yapıyorsanız muhtemelen kurulum bitmiş ve reboot bekliyordur. Çoğu zaman korkmanızı gerektiren bir durum olmaz, güvenle bilgisayarınızı yeniden başlatabilirsiniz.
Bilgisayarınız başarıyla açıldığında tekrar terminali açınız ve terminale şu komutu yazınız:
nvidia-smi
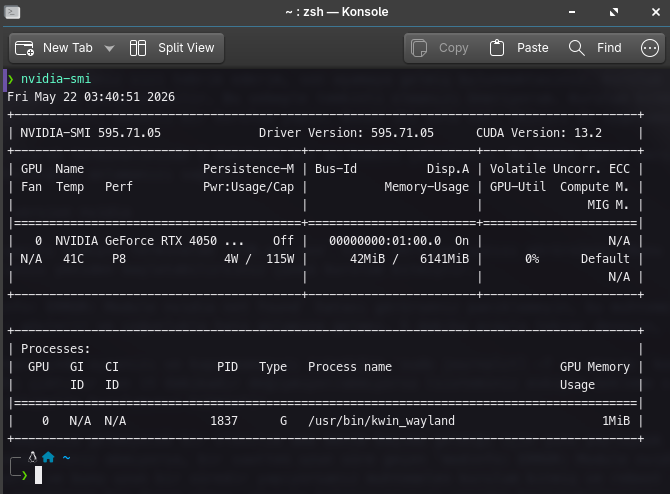
Bu görseldekine benzer bir çıktı görüyorsanız başarıyla kurulum yaptığınız anlamına geliyor. Bundan sonra bu adımları tekrar etmenize gerek kalmayacak, sistem güncellemeleriyle Linux’unuz size en yeni nvidia sürücüsünü getirecektir.
Warning: The contents shared in this blog are for informational purposes only. No liability is accepted for any errors, omissions, or issues that may arise from its use. Applying the steps described is entirely at the reader’s own risk.
Introduction
Throughout this article, I will explain how to install Nvidia drivers on the Linux Fedora 43 rawhide operating system.
Fedora, which is an operating system often recommended to newcomers in the Linux world, does not include closed-source (proprietary) drivers in its packages due to its open-source policy. For this reason, if you want to install the Nvidia driver on a computer with an Nvidia GPU, you have to add the RPM Fusion repository to the system and install it manually.
You can access RPM Fusion at https://rpmfusion.org/. My source will mostly be there.
Although it is not a very difficult process, it can probably be a bit confusing for Linux beginners. By applying the methods I will explain below step by step, you can easily install the Nvidia drivers and always stay on the most up-to-date system along with system updates.
1. Preparation
We will run a command to confirm that the system is up to date and ready. To do this, you first need to open a terminal. Although the shortcut is usually Control + Alt + T, this can change on systems like XFCE, so if you cannot open it with a shortcut, just typing Terminal in the search bar will be enough. I will be referring to this whenever I say “open a terminal” throughout the guide. Don’t let the terminal seem complex or scary. Believe me, the hardest thing you will do is copy and paste.
My terminal is Konsole, the default terminal of the KDE desktop environment. I also use zsh instead of bash, so my terminal visual in the screenshots might look different to you. But I assure you it has absolutely no difference from the interface in your terminal which is likely username@PCname, it is purely aesthetic. If you want, I can write a guide for that too :) Anyway, let’s not digress.
Type this command in the terminal
sudo dnf update
As soon as you type this, it will ask for your password. Enter your password. You won’t see what you type with * etc. Don’t worry, you are entering the password. After entering it completely, press the Enter key. Updates will start as soon as you press it. If it asks for update and package confirmation, just type y and proceed. When everything is finished, it will say something like x packages updated, username@PCname will appear, and it will let you type things in the terminal again.
The part mentioned up to here will not be detailed again in the rest of the article, and the same things will be done with the same methods.
Warning: If you have newly installed the system and are updating for the first time, I recommend restarting the system. Otherwise, you might experience issues.
Then we will activate the RPM Fusion packages on our system. For this, you will now need to run this code in your terminal. The code will take a very short time.
sudo dnf install https://mirrors.rpmfusion.org/free/fedora/rpmfusion-free-release-$(rpm -E %fedora).noarch.rpm https://mirrors.rpmfusion.org/nonfree/fedora/rpmfusion-nonfree-release-$(rpm -E %fedora).noarch.rpm
When this is also done, you can move on to the second step.
2. Secure Boot Key Enrollment
Now we are at the second step. Although this step looks a bit complicated, it’s actually quite easy. First, your system might have secure boot enabled for some reason, we need to check this. Run the following command in your terminal.
mokutil --sb-state
If you get an enabled return, you can skip this step and move to step 3. Do not perform any additional steps regarding secure boot!
If you get a disabled return, you will need to enable secure boot on your computer.
2.1. Secure Boot Setup
First, you will need to install the following required libraries to generate a key.
sudo dnf install kmodtool akmods mokutil openssl
Then, create a default key.
sudo kmodgenca -a
If you get an error like WARNING: EXISTING KEY PAIR while doing this, type the command with force like this.
sudo kmodgenca -a --force
If there was no problem, do not write the forced command!
When you handle this part too, you need to create a key by entering the command below. Enter a very simple password for the key like 0000.
Warning: Do not use the numpad while entering numbers, you might have problems. Use the number keys in a row above the letters instead. The boot menu sometimes may not detect the numpad.
sudo mokutil --import /etc/pki/akmods/certs/public_key.der
After doing this, you will need to restart your system. When you restart, you will encounter a blue screen.
If it’s not this screen but something like MOK management, just pressing Enter once will suffice. You will reach this screen.
The only thing you will do here is go down with the arrow keys and say Enroll MOK. Then say Continue, select Yes, and you will come to the password entry menu. Here you will not use your own password, but the key like 0000 I mentioned above. Then select Reboot to restart your computer.
Wait for your computer to turn on and that’s it. You have already finished the hard part.
3. Installing the Drivers
Now that you have enabled secure boot on your system, you are completely ready to install drivers. In this step, you first need to know your Nvidia GPU. If you know which GPU you are using, there is no problem. If you don’t know, you can find out by running the following command in the terminal.
lspci | grep -iE 'VGA|3D|nvidia'
Before starting the installation process, you can log it so you can monitor the installation more clearly. Open a new terminal and paste this command into it.
sudo journalctl -f -u akmods
As long as this command runs, it will monitor Nvidia changes, and a log will fall into the terminal when there is a change. Do not close this terminal. Open a new terminal for installation.
Your graphics card must be in one of these four groups. You can find your exact group by searching your GPU model on the internet. Or you can group it directly from your model’s brand name. If you have a device you bought within the last 15 years, it will most likely be in the 1st or 2nd groups, but you should check anyway.
Start the installation by pasting the command that belongs only to your group into your terminal. Since download sizes are large, the installation may take a while.
- NVIDIA’s new GPUs (Post-2017 Geforce 1000 onwards e.g.: GTX1080, Quadro, Tesla, RTX models)
sudo dnf install akmod-nvidia sudo dnf install xorg-x11-drv-nvidia-cuda - NVIDIA’s relatively new GPUs (2014-2017 GTX 800/900/10 models)
sudo dnf install xorg-x11-drv-nvidia-580xx akmod-nvidia-580xx sudo dnf install xorg-x11-drv-nvidia-580xx-cuda - NVIDIA’s relatively old GPUs (Geforce 600/700 Kepler, Quadro models)
sudo dnf install xorg-x11-drv-nvidia-470xx akmod-nvidia-470xx sudo dnf install xorg-x11-drv-nvidia-470xx-cuda sudo dnf install plasma-workspace-x11 xorg-x11-drivers xorg-x11-xinit - NVIDIA’s old GPUs (400/500 Fermi)
These graphics cards are no longer supported by Nvidia. Because of this, there is no Wayland support, so make sure you use xorg.
sudo dnf install xorg-x11-drv-nvidia-390xx akmod-nvidia-390xx
sudo dnf install xorg-x11-drv-nvidia-390xx-cuda # Required for nvidia-smi and CUDA support
Warning: Shutting down the computer as soon as the installation closes can break your system. Never ever turn off your computer before completing step 4.
4. Confirming System Setup
If you have come this far, congratulations, you are at the final stage. Although the installation is very quick, it may be slow on some systems. For this reason, I advise you to be cautious. Restarting before the installation is finished can break your system. Do a safe installation. There are two ways to do this, applying both would be better for you.
As the first method, run this command in your terminal every 5 minutes. This command shows you your active version and helps you understand that the installation is complete.
modinfo -F version nvidia
If the installation is successful, you will see a version text like 570.xxx.xxx in the terminal. As soon as you see this, you can restart your computer because the installation is finished.
If you see the error modinfo: ERROR: Module nvidia not found, do not panic, this probably shows that your installation is not finished yet and mostly does not mean an error. Try again 5 minutes apart, make use of the second method.
Examine your terminal with the sudo journalctl -f -u akmods command, which I asked you to open earlier and not to close. If the outputs in the terminal have not changed/flowed for the last 15 minutes (if your system is old, extend your waiting time up to 1 hour), your installation is most likely finished.
It’s a possibility that probably won’t happen to you, but since it happened to me, I want to share this. If your log terminal is not flowing, and the ‘modinfo: ERROR: Module nvidia not found’ command continues to give an error for over an hour, and you’ve been doing this for a long time, the installation is probably finished and waiting for a reboot. Most of the time there is nothing to fear, you can safely restart your computer.
When your computer boots up successfully, open the terminal again and type the following command into the terminal:
nvidia-smi
If you see an output similar to this image, it means you have installed it successfully. After this, you won’t need to repeat these steps, your Linux will bring you the newest nvidia driver with system updates.